|
Mastering the art of breathing during the shot process is a skill that separates novices from experts. Understanding how to break a shot during a natural respiratory pause is crucial. In this blog post, we'll delve into the significance of controlled breathing, explore the techniques for optimizing your breath during shooting, and uncover the secrets of breaking the shot at the perfect moment.
The Importance of Controlled Breathing Breathing is an essential physiological process that impacts various aspects of our well-being, including shooting accuracy. When we inhale and exhale, our body undergoes subtle movements, affecting the alignment of our sights and the steadiness of our hands. As such, uncontrolled breathing can lead to erratic shooting patterns, compromising precision. When hunting, "buck fever" and excitement definitely affects precision. Learning how to control your breathing will allow you to regain control over the automatic response when excitement sets in. Understanding the Respiratory Pause The respiratory pause is a brief moment between inhalation and exhalation when the body naturally holds its breath. During this pause, the body achieves relative stability, making it the ideal moment to break the shot. Identifying this moment is fundamental to enhance your shooting performance, as it minimizes the risk of disrupting your aim due to involuntary body movements. Breathing Techniques for Precision Shooting
Once you've mastered controlled breathing techniques, the next step is to learn how to break the shot at the right moment during the respiratory pause. This requires a combination of mental focus, muscle memory, and timing.
Mastering the art of breathing during the shot process and breaking the shot during a natural respiratory pause are essential skills for precision shooting. By practicing controlled breathing techniques and developing an understanding of your body's natural respiratory patterns, you'll significantly enhance your shooting skills. Remember, consistent practice and patience are key to achieving excellence in precision shooting. So, take a deep breath, steady your aim, and break the shot with confidence!
0 Comments
Master the ability to maintain visual contact with the target throughout the shot process and beyond. Keeping your eye open during the shot and recovering from recoil is an art that requires practice, determination, and understanding of the shooting mechanics.
Why Keep Your Eye Open During the Shot Process? The adage "keep your eye on the target" holds true, especially in precision shooting. Closing your eyes or losing sight of the target during the shot process can lead to several detrimental consequences:
Keeping your eye open during the shot process and while recovering from recoil is a fundamental skill for precision rifle shooters. With consistent practice, you can master this technique. Remember, it's not just about hitting the target once but maintaining visual contact to hit it multiple times with precision and accuracy. Happy shooting! Hitting targets requires a combination of skill, patience, and unwavering focus. Sight alignment through the scope and focused on the reticle is undoubtedly one of the most crucial. A seasoned marksman understands that proper reticle alignment lays the foundation for consistent and precise shooting. In this blog post, we delve into the significance of sight alignment and how it plays a pivotal role in achieving excellence in precision rifle shooting.
The Role of the Scope Reticle The scope reticle, commonly known as the crosshair, is an integral part of any precision rifle setup. It is a set of fine lines or markings inside the scope that helps shooters aim accurately at their intended target. The reticle's center point typically serves as the reference point for aligning the rifle with the target. But, "Christmas Tree Reticles" or other specialized reticles provide additional aiming points. Sight Alignment Defined Sight alignment refers to the correct positioning of the shooter's eye and the rifle's scope, ensuring that the shooter's eye is perfectly aligned with the scope's optical axis. This alignment is vital to eliminate parallax error and distortion, enabling the shooter to acquire a clear and precise sight picture. You know if you are aligned if the sight picture is free of "scope shadow". The Crucial Steps to Achieve Perfect Sight Alignment
Achieving consistent sight alignment through the scope reticle is a skill that demands practice and dedication. Frequent range time and dry-fire practice at home can help build muscle memory and refine this critical aspect of precision shooting. Creating stable positions is necessary to always maintain consistent and proper alignment of the eye to the scope. Conclusion In precision rifle shooting, sight alignment through the scope reticle is key. By mastering proper eye positioning, scope leveling, and precise reticle alignment, shooters can enhance precision. As skills improve you can unlock the full potential of your rifles and consistently hit targets with unerring precision. Precision rifle shooting demands impeccable trigger control. In the pursuit of precision, dry fire practice emerges as an indispensable tool. By simulating live-fire scenarios without ammunition, dry fire practice allows shooters to fine-tune their technique, build muscle memory, and ultimately elevate their shooting. In this article, we will delve into the benefits of dry fire practice for precision rifle shooting and explore effective tips to enhance your trigger control.
The Essence of Trigger Control Trigger control is the art of initiating a shot without disturbing the alignment of the rifle. A smooth and steady trigger press is vital for precision shooting. The slightest jerk or flinch impacts precision. It's essential to maintain control throughout the entire process, from prepping the trigger to the break and follow-through. Safety First Before embarking on any dry fire practice, prioritize safety above all else. Choose a safe location with a clear line of sight and a secure backstop. Ensure that your rifle is unloaded, and visually inspect the chamber and magazine to verify there is no live ammunition present. Always double-check and triple-check to ensure the firearm is clear. Building Muscle Memory Dry fire practice offers an excellent opportunity to build muscle memory, which is essential for consistent shooting. By repeatedly going through the motions of acquiring the target, aligning the sights, and executing a smooth trigger press, your body and mind become accustomed to the sequence. This muscle memory carries over to live-fire situations, allowing you to perform with more confidence and precision. The Benefits of Dry Fire Practice
Dry fire practice is an invaluable tool for precision rifle shooters seeking to enhance their trigger control and overall shooting performance. Through dedicated practice, shooters can refine their technique, build muscle memory, and eliminate unwanted habits that can compromise accuracy. Remember, safety should always be the top priority, and regular, focused dry fire practice can take your precision rifle shooting to new heights. So, embrace the power of dry fire practice, and watch your shooting skills soar! Regenerate response When it comes to precision shooting, one of the most critical factors is trigger control. Proper trigger manipulation creates consistent shots free from any disturbances caused by jerky or hasty movements. In this article, we'll delve into the importance of trigger control and provide valuable tips on how to press the trigger slowly and steadily, without disturbing the rifle, to improve your shooting prowess.
Establishing a Solid Grip Before focusing on trigger control, it's essential to ensure you have a positive grip on the rifle. Proper grip provides a foundation for better control throughout the shooting process. Additionally, a consistent grip helps maintain control and minimizes movement that might disturb your aim. Smoothly Engaging the Trigger To press the trigger slowly without disturbing the rifle, follow these steps: a. Place Your Index Finger: Position the pad of your index finger, or just behind the pad but before the joint where you can feel the pressure onto the bone on the trigger. Avoid using the joint or the very tip of your finger, as this can lead to jerky movements. b. Apply Gradual Pressure: Begin to apply pressure to the trigger in a smooth, gradual, and controlled manner. The motion should be steady and deliberate. An observer should not see the finger moving. Focus on the sight picture and maintaining alignment with the target. c. Avoid Snatching the Trigger: Jerking or snatching the trigger, especially when anticipating the shot, is a common mistake that disturbs the rifle's position. Maintain a steady pressure without flinching or anticipating the recoil. e. Trigger Break: For a new shooter the shot breaks almost as a surprise. By maintaining a slow, steady press on the trigger, you eliminate the chances of any sudden movements that could throw off your shot. An experienced marksman will have an intimate knowledge and feel when the pressure is adequate to break the shot. This gives the marksman the ability to stop the shot process at any time, because it is an intentional process. Conclusion Experience shows that mastering trigger control can reduce groups between 1/4 and 1/2 depending on how poor the technique is to begin with. Mastering trigger control improves precision and consistency. By employing a slow and steady trigger press, you can stop moving the rifle when you initiate the shot. Happy shooting! Camo is -mostly- man fashion. At close range, camo that breaks up human forms and pattern is helpful, even if it is orange and green. But, at 400 yards, your super secret stealth camo could be making you glow like a scorpion during the day or night. Are you making that mistake? Keep reading to see if you glow like an alien in the woods.
Deer eyes are completely different than human eyes. Sure, all the structures are the same, but its like the difference between a sports car (human eyes) and a 4x4.
Deer can see blue and the UV enhancers that are put in clothes detergent. So, make sure you don't wash with scents or "color enhancers" in your detergent. https://digitalcommons.unl.edu/cgi/viewcontent.cgi?article=1279&context=icwdm_usdanwrc There isn’t a better combo than this watch and a rangefinder…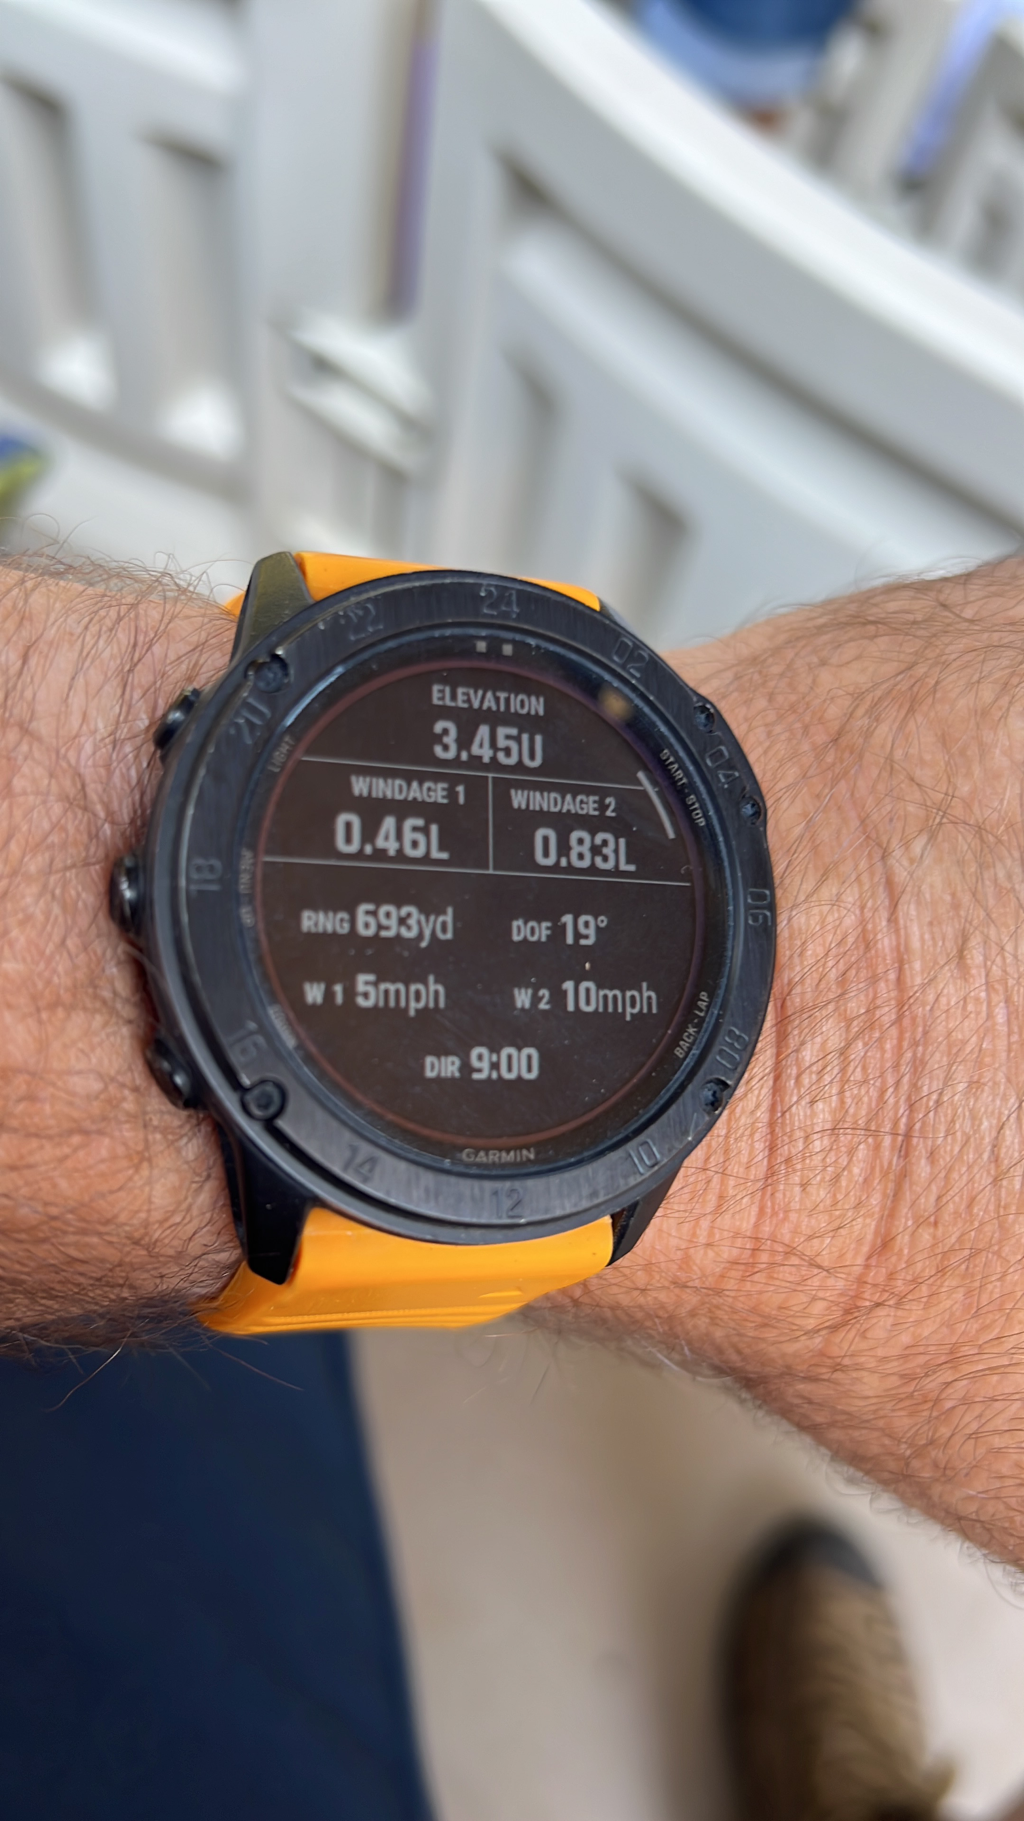  Recoil management separates the experts from the amateurs. And, it punishes experts that get lazy... Recoil management is essential for staying on target before the bullet leaves the muzzle, and maintaining the target in the scope. Consistent recoil management is one of the most important skills for precision rifle, and has a bigger effect than the ammo you shoot or the rifle itself. Without the ability to control the rifle, you cannot reach consistent precision shot to shot, group to group, day to day and from position to position. We've all experienced shooting great groups behind the bench in perfect conditions, and then missing "the same shot" in field conditions. Shooters in precision rifle competitions, especially NRL Hunter matches know that the crosshair can be on the target, but the shot can miss big targets for lots of reasons that have nothing to do with the gear. Long-range precision shooting demands exceptional marksmanship skills, and one crucial aspect that sets the experts apart from the amateurs is the ability to manage recoil. HERE IS THE NUGGET OF KNOWLEDGE: Recoil starts and the recoil impulse is already moving the rifle when the bullet leaves the muzzle. This is the first and shorted part of the recoil impulse as the energy begins to move the rifle. The second part of the recoil impulse is the longest and continues from the time the bullet leaves the barrel the rifle until the recoil impulse ends and the rifle returns to rest. Let's talk more about two "portions" of the recoil process to understand. And, the first is the most important to precision and "group size". 1) BEFORE the bullet leaves the barrel Brakes and suppressors DO NOT change the recoil impulse while the bullet is in the barrel. They work because the expanding gasses behind the bullet are hitting the surfaces, which pushes the rifle forward to counteract the recoil impulse that was already moving. Overall, the greater the recoil impulse, the harder it is to control the rifle. So, your recoil management matters much more between a .22 long rifle that requires nothing compared to a mountain rifle in 300 RUM. The bigger your rifle, the more you need to consistently and competently control recoil from the moment the primer pops until the bullet leaves the bore. If you don't your groups will be larger as a result of how much the rifle moves. Yes, I know the bullet is only in the barrel for a fraction of a second and the majority of recoil happens after the bullet leaves the bore. But, when we are talking about precision, it takes very little from the shooter to induce the smallest movements in the rifle to open groups and start stringing shots.. Consider how much we can see our heartbeat moving the rifle: isn't it self evident that a hard recoiling rifle is going to move the rifle more than your heartbeat. The bullet is in the bore for about the same time as the actual "pump" of the heart. I could talk about flinch, but we'll save that for another day. I haven't seen many shooters who have a big rifle and don't have a big flinch, unless they have had specific training. Twice in the last few months, I had two shooters with 300 RUM rifles that complained about groups. I got behind the rifle, managed the recoil, and shot groups under an inch. Now, my control over the rifle after recoil for spotting my shot and target acquisition was terrible. While I was "consistent" as it related to the shot, my form leaves much to be desired with heavy recoiling rifles. Besides, I am a wimp. I hate recoil and especially the concussive blast of brakes. This sets us up nicely for the next part of the discussion. 2) AFTER the bullet leaves the bore. Recoil management after the bullet leaves the bore won't affect the precision of that shot you just broke. But, it will affect your ability to spot your shot, watch your game if hunting, and quickly break a follow up if needed. At its worst, poor recoil management leads to scope eye... The most significant part of controlling the recoil for purposes of maintaining sight picture, is to be squarely behind the rifle and control it with the shooting hand and the non shooting hand. When everything is in alignment the rifle won't deflect at crazy angles, and the grip of your hands will direct the rifle to return to the same position as when the shot was fired. Here's to better shooting!  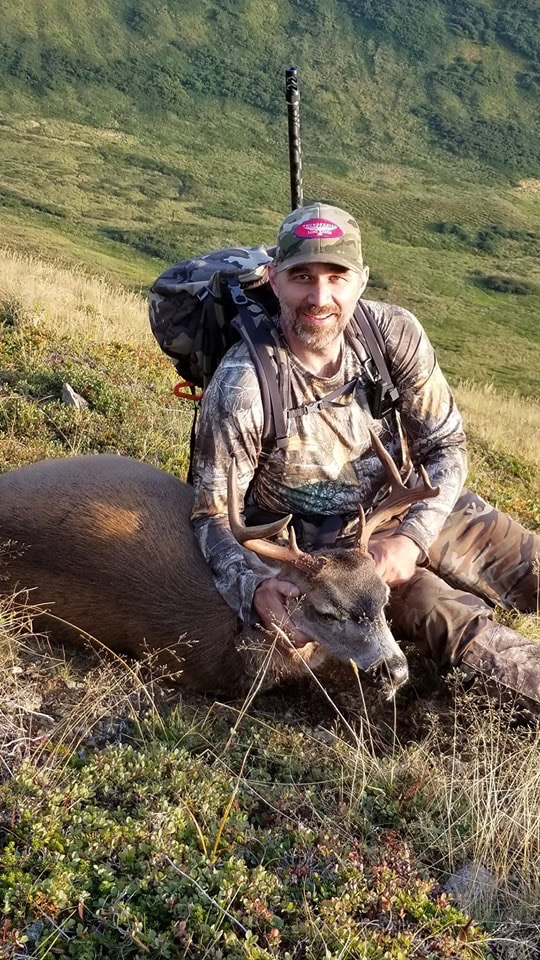 Skinner and I are prepping for another Alaskan adventure. The blacktail in the picture was the first time we went to Alaska. We said we'd be back, and this time we'll be hunting caribou on the North Slope in two months.
We've been dreaming and planning for this for more than a year. But, it is now crunch time. We are gathering our gear and asking ourselves questions about what to bring. Limited space and weight limits won't let us take the kitchen sink. Gear goes onto the pile, and gear gets taken out as we ask ourselves some questions. Comfort, survival, glassing, shooting, and more reasons stalk us.
We have learned that suffering and challenges are part of the adventure. They will always be there. And, once we put in all the time and money to get there, and then the suffering and work to hunt, we want to make the shot count. We won't regret it if we suffer a little, but we will regret it if we miss the shot because we left out a critical piece of gear that made the difference in success. |
 RSS Feed